
Ted, an easy rich text processor
Ted
is a word processor running on the Unix/Linux desktop. Ted was developed as a standard easy
word processor, having the role of Wordpad on MS-Windows. Since then, Ted has evolved to a real word processor that still has the same
easy appearance as the original. The possibility to type a letter, a note
or a report on a Unix/Linux machine is clearly missing. Only too often, you
have to turn to MS-Windows machine to write a letter or a document. Ted was made to make it possible to edit
rich text documents on Unix/Linux in a wysiwyg way. RTF files from Ted are fully compatible with MS-Word.
Additionally, Ted also is
an RTF to PostScript and an RTF to Acrobat PDF converter. Ted is a simple standalone program to
edit RTF files and to convert them to PostScript and to PDF. It is not part
of an office suite that can do about anything. Ted focuses on doing the two things that it was made for well. It
leaves the rest to the heavyweight multipurpose software suites.
Compatibility
with popular MS-Windows applications played an important role in the design
of Ted. Every document
produced by Ted fully
compatible with MS-Word without any loss of formatting or information.
Compatibility in the other direction is more difficult to achieve. Ted supports many of the formatting
features of the Microsoft applications. Other formatting instructions and
meta information are ignored.1 By ignoring unsupported
formatting Ted tries to get
the complete text of a document on screen or to the printer. Ted can be used to read formatted e-mail
sent from a Windows machine to Unix, to print an RTF document, or to
convert it to Acrobat PDF format. Below we explain how to configure Ted as an application to open RTF
documents and how to convert an RTF document to PDF with Ted and
GhostScript.
I hope
that you will find Ted
useful. Please report the bugs you find, such that I can fix them.
This is
the documentation for Ted
2.23 released on Feb 3, 2013. Release Notes with a change log are in a separate
document.
The
picture of a writing schoolboy on the application window is the lower right
corner of a woodcut by Albrecht Dürer dated 1510. It represents a
schoolmaster teaching a class of children. Its motto is: Wer recht bescheyden wol werden, Der pit got trum bye auff erden.
Ted
is free software. By making Ted freely available, I want to contribute to the propagation of
Linux as a viable platform for technical computer enthusiasts. As Ted is free software, I assume no
responsibility for the consequences of using it. It is up to you to decide
whether Ted suits your
purpose or not. Ted is
distributed with absolutely no warranty under the terms of the GNU Public License.
To start Ted as an
interactive program, just invoke Ted &. To start Ted
with a certain file invoke Ted some.rtf &. Several special purpose calls of Ted are documented below. Note that from Ted 2.22, Ted keeps
a trace of your editing activity. The name of the trace file is the name of
the document that you are editing with .Ted appended. If the current directory is not writable, Ted uses a trace file in /tmp. For fresh documents, Ted uses a trace file with a unique name
ending in .Ted. After
abnormal termination of an edit session, the trace file may be left over.
Open it with Ted to try to
recover your work, or delete it to unlock the document. Teds recovery does not include the very
last edit action. Use the Repeat menu option to perform the last action of
a recovered session.
The installation of Ted depends on the platform and on the
kind of distribution. Binary distributions for Intel ix86 Linux are
available from the download site http://ftp.nluug.nl/pub/editors/ted.
The distribution comes in the form of compressed tar archives and as Red
Hat package manager (RPM) packages and Debian installer packages (DEB).
Binary distributions for other platforms might be available. For more or
more recent information refer to the Ted web site http://www.nllgg.nl/Ted. All binary installer .tar.gz packages are packaged relative to
/.
To install Ted or one of the localization packages
from an RPM package, log in as root, (Or any system user with sufficient
permissions to install packages.) and give the command rpm -i <package-details>.rpm
. To upgrade from a previous version of Ted give the command rpm -U
<package-details>.rpm. The corresponding
command on Debian based Linux versions like Ubuntu is
dpkg -i <package-details>.deb. It takes care of installing as well as of upgrading. I used
Ubuntu 12.04.1 to build the *.deb and *.tar.gz
files and fedora 17 to build the *.rpm files. A Solaris build can be installed with pkgadd -d <package-details>.pkg.
To compile Ted from source. Refer to the
compilation instructions at the end of this document.
Overview of the different packages:
|
Package
|
Package files
|
|
Basic binary package for Intel Linux.
(Includes American spelling)
|
|
|
Source2
|
|
|
Original Documentation and Release Notes
|
|
|
rtf to pdf script
rtf to PostScript script
rtf to HTML script
rtf to EPUB ebook script
rtf to plain text script
|
|
|
Dutch spelling and messages
|
|
|
British spelling
|
|
|
German spelling and messages.
|
|
|
Spanish spelling and messages
|
|
|
Argentinian Spanish spelling and messages
|
|
|
Portuguese spelling
|
|
|
Brazilian Portuguese messages
|
|
|
French spelling and messages.
|
|
|
Italian spelling and messages
|
|
|
Czech spelling and messages
|
|
|
Danish spelling and messages
|
|
|
Swedish spelling
|
|
|
Norwegian spelling and messages
|
|
|
Polish spelling and messages
|
|
|
Slovak spelling and messages
|
|
|
Hungarian messages
|
|
|
Malagasy messages and manual
|
|
|
Bulgarian spelling
|
|
|
Russian spelling
|
|
|
Croatian spelling
|
|
|
Finnish spelling
|
|
|
Translated Documentation
|
|
|
Spelling dictionary examples.3
|
|
|
Translated resource files for translators
and those that like to install them by hand.
|
Ted
uses rtf as its native file format. I have chosen the rtf format because it
is an old file format that is understood by many text processing programs.
The fist version of the Microsoft RTF file format specification dates from
1987 and RTF has since then become the lingua franca for document exchange
between word processors on the Apple Macintosh and on other computers: Many
applications can understand RTF files and most people have a program that
can render RTF installed on their computer. Not only word processors like Microsoft Word, AbiWord, Calligra Words
and Libre Office, but also
standard programs operating system programs like
WordPad, TextEdit and write.exe
understand the RTF file format. This makes RTF a good file format to reach
a heterogeneous audience with many different computers and operating
systems. From its origin, RTF has been a Microsoft file format. Some of us
may fear that the legions of evil might infest his computer once he begins
to use it. In practice however, it is a good simple portable file format.
If it were formally standardized, it could be seen as an open standard for
simple word processing documents.
As the Microsoft Word
export file format, RTF describes Word documents. The current rtf 1.9
specification covers most of the functionality of MS-Word 2007. This does
not mean that a program that reads and writes RTF has to be as elaborate as
Microsoft Word. In fact almost no software that reads and writes RTF is as
elaborate as Microsoft Word. Almost any application that reads rtf files
[including Ted] silently
ignores unknown RTF control words. This even applies for MS-Word itself.
The result is that no two programs write exactly the same RTF variant and
that many consciously designed or accidentally born RTF dialects exist.
Examples of accidental variants are the typo \fc tag for \cf on
the NextStep platform fifteen years ago or the recent
\nobrdr tag in Open Office that seems to mean the
same thing as \brdrnone in
the Microsoft specification. An example of consciously designed deviations
are the {\*\pgdsctable and {\pgdscN groups
that Star Office emits. Sun could be excused for this because an a {\*\something group is there to be
ignored. The fact that the tags are undocumented is not nice however.
The RTF file format is
relatively well documented. Every few years, Microsoft issues a fresh
specification that matches a recent version of MS-Word. The latest version
that I have seen is the rtf 1.9 specification. It corresponds to MS-Word
2007. The location on the Microsoft site changes all the time. The easiest
way to find the document is to search for "Rich Text Format (RTF)
Specification" with Google. (Note the double quotes.) Though the document gives many
details of the file format and all the RTF control words, the the meaning
of the control words is only concisely explained. The O'Reilly RTF Pocket Guide by Sean M. Burke is a
good introduction to RTF and a valuable companion to the Microsoft file
format document. An email discussion list of the RTF file format can be
found at http://list.unm.edu/archives/rtf-l.html.
|
6) |
|

|
➊ A preview of
the font
➋ The file name
of the font
➌ The
implementation name of the font
The rest is illustrated
by the example below
She
puzzled over this for some time, but at last a bright thought struck her.
'Why, it's a Looking-glass book, of course! And if I hold it up
to a glass, the words will all go the right way again.'
This
was the poem that Alice read :
jabberwocky➑ 'Twas brillig, and
the slithy toves
Did gyre and gimble in
the wabe;
All mimsy were the
borogoves,
And
the mome raths outgrabe.
etc➎
'It
seems very pretty,' she said when she had➍ finished➏
it, 'but it's rather➐ hard to understand!' (You see
she didn't like to confess, ever to herself, that she couldn't
make it out at all.) 'Somehow it seems to fill my head with ideas
—only I don't exactly know what they are! However, somebody killed something: that's clear, at any
rate—'
|
|
| |
|
The ugly example below shows the meaning of
the different controls.
JABBERWOCKY 'Twas brillig, and
the slithy toves
Did gyre and gimble in
the wabe;
All mimsy were the
borogoves,
And
the mome raths outgrabe.
etc
|
|
| |
|
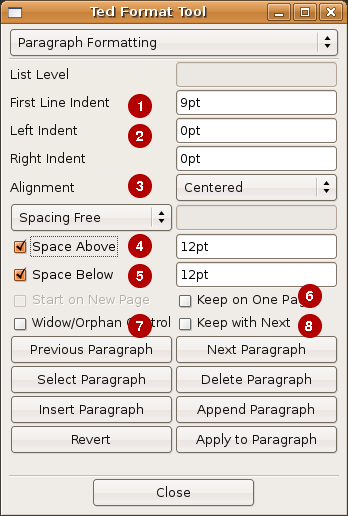
➏ If
possible, keep all lines of the paragraph on one page ➐ Widow/Orphan
control is the mechanism that avoids that the first or the last line of a
paragraph lands on a different page than the rest. ➑ Keeps
the paragraph on the same page as the next one. E.G. Because the paragraph
is the header of the next one. The others are best illustrated by the
example below.
Queen Alice➌ And hundreds of voices
joined in the chorus:
➋'Then fill up the glasses as quick as you can,➍ And sprinkle the table
with buttons and bran:
Put cats in the coffee,
and mice in the tea—
And
welcome Queen Alice with thirty-times-three!'➎
➊Then followed a confused noise of cheering, and Alice thought
to herself, 'Thirty times three makes ninety. I wonder if any one's
counting?' In a minute there was silence again, and the same shrill
voice sang another verse;
|
|
| |

|
Before the introduction
of tables, tab stops existed as a primitive means to align the text in
subsequent paragraphs of the same document. Though tables are a more
comfortable solution, tab stops still play an important role in text
processing. Ted supports
four types of tab stops.
The text after the tab
stop is left aligned to the tab stop. The text after the tab
stop is right aligned to the tab stop. Effectively the text appears left of
the tab stop. The text after the tab
stop is centered around the tab stop. The text after the tab
stop is right aligned to the tab stop. The decimal point in the text is
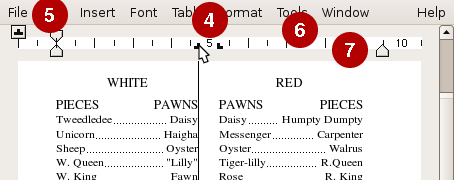
placed at the tab stop position. The
meaning of the controls on the tool is best illustrated by an example:
DRAMATIS PERSONÆ➋
WHITE➋ RED➋
PIECES ➌PAWNS➋
➋PAWNS PIECES➋
Tweedledee Daisy Daisy
Humpty Dumpty
Unicorn Haigha Messenger
Carpenter
Sheep Oyster Oyster
Walrus
W. Queen "Lilly"
Tiger-lilly R.Queen
W. King Fawn Rose R.
King
Aged Man Oyster Oyster
Crow
W. Knight Hatta Frog
R.Knight
Tweedledum ➌Daisy Daisy Lion
|
|
| |
|
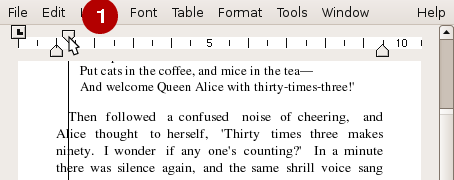
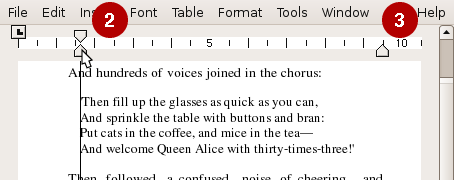
You can also manipulate the paragraph ruler
with the mouse.
➊ Move
the First Line Indent. ➋ Move
the Left Indent ➌ Move
The Right Indent ➍ Move
Tab stops ➎ Clicking
the button selects the kind of tab you make. ➏ Make
new tab stops by clicking in the white band ➐ Remove
tab stops by dragging them from the white band. |
|
| |
|
Best Illustrated by yet another ugly example
jabberwocky
'Twas brillig, and
the slithy toves
Did gyre and gimble in
the wabe;
All mimsy were the
borogoves,
And
the mome raths outgrabe.
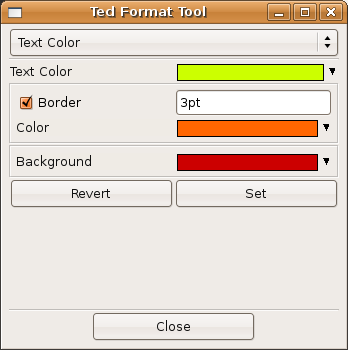
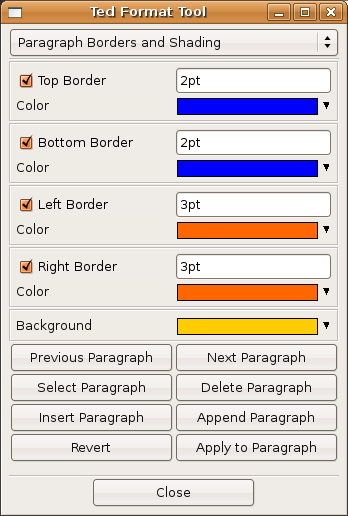
The maximum border width
is 3.75pt
|
|
| |
|
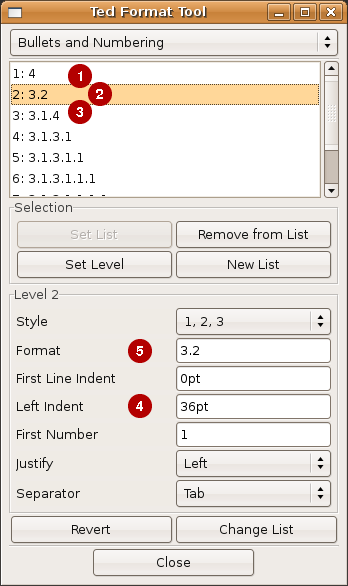
The example list below mentions some
controls on the Bullets and Numbering tool. The controls are organized in a list that has the same
hierarchy as the controls have on the tool.
In the text box for the use <control>digit
to insert placeholders for the level numbers. <control>1 is the
top level. To join an existing list in the document, use the copy/paste
menu options for the paragraph ruler. Use the Font and Text Color
tools to change the presentation of the paragraph number.
Bullets and Numbering tool
1 List
of List Levels 2 Operations
on the Selection 2.1 Set
List 2.2 Remove
from List 2.3 etc 3 ➊ Properties of the current List Level.
➍ This Item also shows the working of the left
indent. 3.1 Style 3.1.1 ➌ 1, 2, 3 3.1.2 I,
II, III 3.1.3 etc. 3.2 ➋
➎ Format 3.3 First
Line Indent 3.4 Left
Indent 3.5 First
Number 3.6 Justify 3.6.1 Left 3.6.2 Centered 3.6.3 Right 3.7 Separator 4 Revert 5 Change
List |
|
| |

|
➊ The
number of the current section in the document. ➋ Determines
whether the section starts in on a new page, or in a new newspaper style
column. (As opposed to table columns) ➌ Select
the page number style. In an introduction or an appendix you can use roman
style numerals. ➍ If
you want page numbering in this section to start from the beginning, you
can give the number of the first page. ➎ Choose
the number of newspaper style columns. ➏ Decide
whether all columns should have the same width ➐ Check
to get a line between the columns. ❽ The
width of the column ➒ The
width of the spacing between the columns The concept a section that starts on a
column break is a bit strange as the number of columns is a property of the
section itself. This can only predictably be done if the previous section
has the same column layout. Experimentation with MS-Word showed that the
columns of a section are balanced if and only if the next section starts
immediately below the section that is to be balanced. I.E. it does not
start in the next column, or on a subsequent page.To get balanced columns,
you sometimes have to insert an empty dummy section.
|
|
| |
|
If your desktop is correctly configured, the
local input method that is compiled into the libraries supports a compose
key. The <compose> key allows you to insert accented characters
by typing <Compose> <Letter> <Accent> or
<Compose> <Accent> <Letter>. Where <Accent>
is an ASCII character that resembles the intended accent. E.G. <Compose>
a ' results in á. Another example: <Compose> a e results in
æ. On PC keyboards the 'Compose' key is often labeled 'Scroll
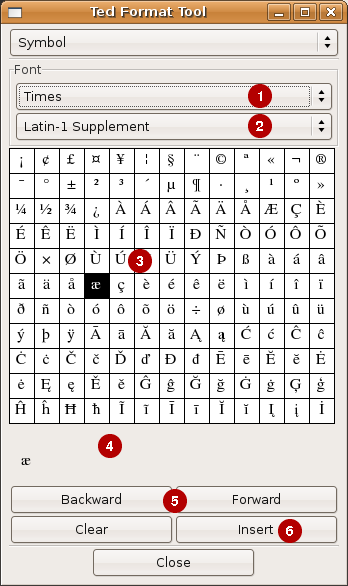
Lock' for your amusement. Refer to the paragraph on desktop
configuration for some further remarks. Besides that, you can use the
symbol tool to insert arbitrary symbols.
➊ Select the font you want to use. ➋ If
you know, select the unicode block your symbols belong to. ➌ Pick
symbols to insert. ➍ They
are collected at the bottom of the tool. ➎ Navigate
over the unicode blocks ➏ Insert
the symbols that you have collected. And once she had really frightened her old nurse by shouting suddenly in her ear, 'Nurse! Do let's pretend that I'm a hungry hy➏æna, and you're a bone.' |
|
15) |
|
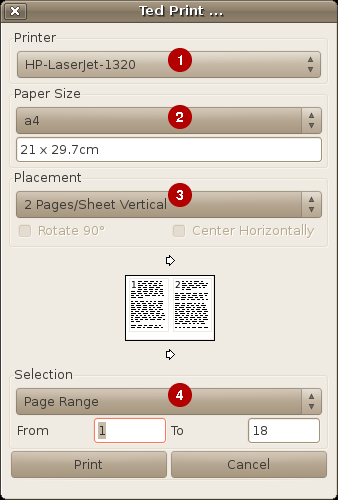
|
➊ Select
a printer or 'Print To File'. ➋ Tells what the format of the paper in the
printer is. The default comes from libpaper or the contents of the /etc/papersize file. ➌ Determine
how the pages of the document are placed on the sheets in the printer. The
diagram below gives a clue about what the options mean. ➍ If
you only want to print certain pages you can select them here. The list of printers is
determined by calling the operating system printer management command. The
following commands are tried in the order given. The first command that
returns any printers determines the list of available printers and the
print command that is used. (lp or lpr.)
• lpstat
-a (Use lp to print) • lpc
status (Use lpr to print) • /usr/sbin/lpc
status (Use lpr to print) • enq
-As (An AIX command, use lp to print) Probably you use a special command to print
to a PostScript printer. You can print to a custom printer by setting two
properties in the configuration file. The property
Ted.customPrintCommand is the command to print to
the custom printer. Ted.customPrinterName is the name of the custom printer. If
both properties are set, Ted inserts an extra option in the printer selection menu to print
through the given command. Because the custom printing command is something
special, Ted makes it the
default printer. The value of customPrinterName is a short string that is used in the menu to select the custom
printer. The value of customPrintCommand is an arbitrary shell command to print to the custom printer.
If customPrintCommand
contains the pattern %f the pattern is replaced with the name of a
temporary file to print. Otherwise the PostScript to print is piped into
the custom print command. If you use %f in
customPrintCommand , it is the responsibility of customPrintCommand to delete te
temporary file. To configure a second custom printer use the Ted.customPrintCommand2 and Ted.customPrinterName2 properties. The
second custom printer will not become the default printer.
Configure a print preview through evince in
the following way:
Ted.customPrinterName: Preview via evince
Ted.customPrintCommand: evince %f
|
On modern Gnome or KDE based
desktops, you can configure what applications to use to open certain file
types. For details, see the documents on www.freedesktop.org. In the
context of this manual, it is sufficient to know that this can be done by
copying the file @DATADIR@/Ted/varia/Ted.desktop to your $HOME/.local/share/applications directory. For a system wide installation, the file goes to the @DATADIR@/applications directory. This
will add Ted to the Office menu of the desktop as well. The Ted rpm and deb installers install the
desktop file for you.
Older rfc1524 based systems might still use
the mailcap functionality.
Example contents to add to $HOME/.mailcap or /etc/mailcap
is offered in @DATADIR@/Ted/varia/Ted.mailcap. It might also be necessary to associate the rtf file extension to the application/rtf content type. This can
be done in $HOME/.mime.types
or in /etc/mime.types.
In general, it is not
necessary to configure or customize Ted. All texts and default settings of Ted are however configurable. Ted has its own configuration
mechanism. Additionally the texts and settings can be configured through
Ted property files.
Teds
own settings can be configured in two settings files:
@DATADIR@/Ted/Ted.properties and $HOME/.Ted.properties in the users home
directory. The file format is similar to the X11 resource file format or
the Java properties file format: Every line consists of a name value pair.
The name has the format Ted.property: value. Contrary to the X11 format trailing white space on the line is
ignored. Ted does not
support the line continuation syntax of the X11 configuration files.
Completely empty lines and lines beginning with a number sign or an
exclamation mark are ignored. Properties that do not begin with Ted. or Ted* are ignored. For compatibility reasons, an equal sign is
accepted for the colon after the name of the property. System wide
properties are set in @DATADIR@/Ted/Ted.properties. Private settings for a particular user are set in her $HOME/.Ted.properties file. Settings
for a particular invocation are given with
--setProperty name value arguments to Ted. Private settings have priority over
system wide settings. Command line settings have priority over system wide
settings and over private settings. You can use as many --setProperty arguments in a Ted invocation as you want. The
arguments are handled before any of the other command line arguments.
Unknown and misspelled properties are silently ignored. This applies for
the properties in the settings files and for those that are given on the
command line.
Most settings relate to
the texts of the different controls on the windows. These are not covered
in this introductory manual. If you want to change the texts, for example
to make localized Ted
installations, refer to the
config/Ted.properties.sample file for an example
and an explanation. As the sample file contains all the defaults that are
compiled into Ted, only
what you change is relevant. The example property file is extensively
documented.
The
following properties influence Teds functionality:
magnification:
Magnification for drawing
documents on the screen. The default value is 100%. The alternative format
1.0 for 100% is also supported. It has the disadvantage that it depends on
the decimal sign of the current locale. (E.G: 1,2 for 120% in Western
Europe.) Very small and very big values are ignored. 100% magnification
translates to 96 DPI on screen.
unit:
The unit that is used by default. This property influences the
appearance of the ruler and the interpretation of numbers entered in the
format tool. Possible values are: inch, ", cm, mm, points, pt, picas,
pi. The default is inch.
paper:
The format of the paper in the printer. The paper format is also
used as the default page size for new documents. If a smaller page size is
used for a document, Ted
uses the Ted.paper property to print in the upper left corner of the paper.
Possible values are: a4, a5, letter, legal, executive and strings in the
form <Width> x <Height> or <Width> x <Height>
<Unit> where <Width> and <Height> are
numbers. Values for units are given above. If <Unit> is omitted,
the value of the 'unit' property is assumed. Plain text files do
not store a paper size for the file inside the file. The Ted.paper property
is used for the page layout of every plain text file that Ted opens. Note that Ted uses the default paper size of the
system as it is set with the papeconfig command and it is stored in the
file /etc/papersize. The
default format can be overridden with any of the configuration mechanisms.
overridePaperSize:
Use the value of the paper property as the paper size of
documents as they are opened. If the default paper size is a portrait paper
size and a section in the the document has a landscape orientation, it is
rotated to landscape orientation before it is applied to that section. This
setting is more useful for file conversions than for editing.
leftMargin, topMargin, rightMargin, bottomMargin: The default
width of the page margins. The format is <Width> or <Width>
<Unit>. Width is a number. Unit is one of the units mentioned
above. The default unit is the value of unit above.
defaultPrinter:
If you want to use a different
printer than the system default printer as the default printer from Ted, you can set this property to select
that printer the first time you use the Print Dialog. The value is the name
of a printer. Use the same names that you use in the lp -d somePrinter, or
the lpr -P somePrinter commands.
afmDirectory:
The directory where Ted looks for font metric files. Ted only uses font metric files if
fontconfig is disabled. Without fontconfig, only fonts that have a metric
file in this directory can be used by Ted. In a default installation, metric files are expected in
@DATADIR@/Ted/afm. This property is particularly useful when you cannot
install Ted as root, and
hence you have to store the metric files in some private directory. You can
also make the afmDirectory point to the GhostScript fonts directory. E.G.
to /usr/share/ghostscript/fonts. Refer to the section on adding fonts for more details. Use the gs -h command to find the exact
location of the GhostScript afm files.
spellToolSystemDicts:
The directory where Ted looks for spelling dictionaries. In
a default installation, spelling dictionaries are expected in @DATADIR@/Ted/dfa. This property is
particularly useful when you cannot install Ted as root, and hence you have to store the dictionaries in some
private directory.
documentFileName:
The name of this online document
file. In a default installation this is
@DATADIR@/Ted/TedDocument-en_US.rtf.
customPrintCommand:
A command to print through a
custom printer command. Refer to the paragraph on printing for details.
customPrinterName:
The name that is used to designate
the custom printer command on the Print Dialog. Refer to the paragraph on
printing for details.
customPrintCommand2, customPrinterName2: To configure a second
custom printer.
printDialogShowPlacementDrawing: Some laptops have microscopic
screens. Setting this property to 0 hides the diagram that shows the
placement of the document pages on the sheets of paper. This is to make the
dialog a lot lower and to fit on the screen of this kind of computer.
showTableGrid:
By default,
Ted draws a grid to show the structure of tables
without borders. If you set this property to 0 no grid will be drawn on
screen.
fontDirectory:
The directory where Ted looks for fonts to include (embed)
in its printed documents. Refer to the section on adding fonts for more
details. Use the gs -h
command to find the exact value. This property is only used on traditional
UNIX systems that do not use fontconfig. AFM files that have been generated
by Ted have a Ted specific comment that gives the font
file name. So this property is only relevant is neither fontconfig, nor Ted generated AFM files are used.
usePostScriptFilters:
PostScript levels 2 and 3 support
the concept of filters. Filters make it possible to code the images in a
PostScript file much more efficiently. You can deactivate this option when
you have a printer that does not support level 2 filters and the
/FlateDecode filter. Recent versions of GhostScript support both. If you
cannot print all images deactivate this setting. To deactivate set the
value to 0.
usePostScriptIndexedImages: PostScript level 2 has a variant of
the image operator that makes it possible to include images with a color
indirection via a palette in the PostScript file. As many if the images
included in rtf documents are of this kind, setting this property can help
you to reduce the volume of the PostScript that is sent to the printer. All
level 2 implementations, including GhostScript support indexed images. If
you cannot print all images deactivate this setting. To deactivate set the
value to 0.
customPsSetupFilename: The name of a PostScript file that is
used for special printer setup and configuration. The contents of the file
are inserted as part of the Setup section of the PostScript output.
skipBlankPages:
If this parameter is set to 1, Ted skips blank pages while printing.
Pages that are completely empty will not be printed. If the document has
headers and footers, the relevant headers and footers will be printed on
the page and the page will not be blank.
skipEmptyPages:
If this parameter is set to 1, Ted skips empty pages while printing.
Pages that are completely empty will not be printed. A page is not
considered to be empty if it actually is empty, but the document has
headers and footers. Under many circumstances the page would contain a
header and a footer and it will be printed.
omitHeadersOnEmptyPages: If this parameter is set to 1, Ted will not print the page headers and
footers on pages that do not contain any text from the document body or
from notes. By design, this property interacts with the skipEmptyPages and
skipBlankPages in the following surprising way: If both
omitHeadersOnEmptyPages and skipBlankPages are set, a page without any body
content will not be printed at all. However, if both
omitHeadersOnEmptyPages and skipEmptyPages are set, a page without any body
content will be printed as an empty page.
findToolExplicitFocus:
Tell the find tool to get the
keyboard focus when you activate it. Usually this is desirable behavior.
However some window managers make Ted crash when it tried to manipulate the keyboard focus. For that
reason you can set the findToolExplicitFocus to 0 to tell Ted not to move the keyboard focus to
the find tool to avoid problems.
autoHyphenate:
If a word in a line of text is
wider than the width allocated for the paragraph,
Ted makes the word protrude beyond the right
margin. If you set the autoHyphenate property to 1,
Ted will automatically insert optional hyphens (\-)
to fold the word. In general this is undesirable behavior. Only set the
property on the command line and only if you use
Ted to format documents. If the autoHyphenate
property is set while you edit documents, the optional hyphens will end up
in completely arbitrary locations in the document.
avoidFontconfig:
If Ted has been compiled to use fontconfig and freetype,
setting this option to 1 tells Ted not to use fontconfig or freetype. It
will fall back to the afm files and plain ugly X11 text rendering. Turning
off fontconfig has the
disadvantage that fewer fonts are available and that text looks far worse
on screen. For rtf to PostScript/PDF conversion
it has the advantage that Ted
is less dependent on the environment and that documents, that use standard
fonts, are formatted even more more similar to what MS-Word does.
preferBase35Fonts:
If Ted has been compiled to use fontconfig and freetype,
setting this option to 1 tells Ted not to use fontconfig to obtain the list of fonts. It will use the Adobe collection
of 35 core PostScript
fonts. Turning off fontconfig
had the disadvantage the fewer fonts are available. The advantage is that
the documents that you make only use a set of widely supported standard
fonts.
embedFonts:
If Ted knows the
name and location of font files on the file system, it will embed the fonts
in its print out. This has the advantage that the generated PostScript will print identically on all
printers. The disadvantage is that the files are bigger and possibly print
slower. If you set this property to 0, Ted will not embed any fonts in its printout.
useKerning:
If set to 0, Ted
will ignore kerning information in the afm files. This will make Ted start a little faster. The name
suggests that otherwise, Ted
will use kerning. That is not the case. The current version of Ted will never produce kerned output.
The pretentious name was chosen because it is simple an it can be used in
the future for what it actually suggests.
shadingMeshTwips:
The rtf file format supports 12
shading patterns that can be used as a background in the document. A
shading can be applied to table cells, paragraphs and even separate pieces
of text. Though Ted does
not support shading patterns in the user interface, it does so if you print
a document, or if you convert existing documents with a shading to
PostScript or to convert them to Acrobat PDF. For printing, fine patterns
are preferable to coarse ones and for PDF files that you want to view on
screen, coarse patterns are preferable. For that reason, the default value
of 3 points for the grain of the pattern is often undesirable. With this
parameter, you can set the distance between the lines that make up the
shading. The value is the distance between the lines in twips. Sensible
values are between 10 and 100 twips. (0.5 and 5 points)
lenientRtf:
In normal operation, Ted performs elementary checks on the validity of rtf files. E.G.
It checks whether the braces in the rtf file match. If you set this
property to 1, the checks are more lenient and Ted will try to open files that are syntactically incorrect.
traceEdits:
In normal operation, Ted keeps a trace of your editing actions.
Ted uses the trace file to remember the information
that it needs to execute Undo
en Repeat actions. The
trace is also used to recover your work after a crash. If you set the
traceEdits property to 0 (zero) Ted will not make a trace. This also deactivates the Undo, Repeat and Recover
actions.
pdfOutline:
By default, Ted
inserts pdfmarks in the PostScript that it issues to produce an outline
when the PostScript is converted to Acrobat PDF. Set this value to 0 (zero)
if you do not want an outline.
styleTool:
By default, Ted
uses GTK styles to make its tool window smaller. If you prefer a big tool
window, set this value to 0 (zero).
Below
is an overview of the different ways to invoke Ted. All invocations with a --something argument have a ++something
equivalent. The -- variant of a command does not initialize the GUI
(GTK/X/Motif), the ++ variant does. In general, the difference is not
really relevant and the --variant is preferable as it is less expensive.
|
Command
|
Meaning
|
|
Ted
|
Show initial window with menu options to
open files.
|
|
Ted file1.rtf file2.txt ..
|
Open the files on the command line.
|
|
Ted --Find pattern f1.rtf f2.txt
|
Open the files on the command line and
search for pattern.
|
|
Ted --RegFind pattern f1.rtf f2.txt
|
Open the files on the command line and
search for pattern. Pattern is a regular expression. Ted uses the pcre
regular expression matching library by Philip Hazel. For documentation see
http://www.pcre.org. (Please realize that the
casual user does not need to use or understand regular expressions.)
|
|
Ted --TtfToAfm x.ttf y.afm
|
Make an afm file that describes a true type
font. This can be practical when you manually configure fonts for Ted.
|
|
Ted --RtfToPs < x.rtf > y.ps
|
Obsolete invocation: Use --printToFile.
|
|
Ted --RtfToPsPaper A4 < x.rtf >
y.ps
Ted --RtfToPsPaper 100x141mm < x.rtf >
y.ps
|
Obsolete invocation: Use --printToFilePaper.
|
|
Ted --version
|
Show the version of
Ted.
|
|
Ted --platform
|
Show the platform for which Ted was built.
|
|
Ted --build
|
Show the host and the date where Ted was built.
|
|
Ted --fullVersion
|
Show version, platform and build.
|
|
Ted --saveTo f1.rtf f2.txt
Ted --saveTo f1.rtf f2.pdf
Ted --saveTo f1.rtf f2.ps
Ted --saveTo f1.rtf f2.epub
Ted --saveTo f1.rtf f2.html
|
Read a file and save it. (in a different
supported format) Supported formats are *.txt *.rtf, *ps, *.epub and
*.html. As Ted writes
relatively readable rtf, this can be used as a kind of rtf pretty-printer.
With the GhostScript ps2pdf
command on the PATH, *.pdf is also supported. Note that ps and pdf files
are saved with the paper size of the document.
|
|
Ted --printToFile x.rtf y.ps
Ted --printToFile -rtf- -ps- < x.rtf >
y.ps
|
Convert a document to PostScript. Format for
the default paper format. Use -rtf- for the document name to read the
document from standard input. Use -ps- as output name to emit PostScript to
standard output.
This call is used by the rtf2pdf.sh script. If you use the
script from an internet scripting tool like PHP, make sure that both Ted and gs are in the PATH.
Note that this produces ps files with Teds default paper size.
|
|
Ted --printToFilePaper x.rtf y.ps A4
Ted --printToFilePaper -rtf- -ps- A4 <
x.rtf > y.ps
|
Convert a document to PostScript. Format for
the paper size given. Refer to --printToFile for IO redirections. Note that this produces ps files with the
given paper size.
|
|
Ted --print x.rtf
|
Print the document on the default printer.
Format for the default paper size.
|
|
Ted --printPaper x.rtf a4
Ted --printPaper some.rtf 100x141mm
|
Print the document on the default printer.
Format for the paper size given.
|
|
Ted --printToPrinter x.rtf lp1
|
Print the document on the printer given.
Format for the default paper size.
|
|
Ted --printToPrinterPaper x.rtf lp1 letter
|
Print the document on the printer given.
Format for the paper size given.
|
|
Ted --setProperty property value ....
|
Sets the property to a value. In a command
line run the effect is that of setting
Ted.property: value in one of the configuration
files. The command line arguments have priority over the values that come Teds configuration files. You can use as
many --setProperty
arguments as you want to. Unknown properties are silently ignored.
|
|
Ted --FontsDocuments /tmp/fontsdocs
|
Create a directory and for every font that Ted knows about, store a document with
all the symbols in the font. This is excellent testing material. It can
also be used to view the fonts. The
checkfontsdocs.sh job can be used to check whether
the documents are correctly handled.
|
|
Ted --GSFontmapForFiles `pwd`/*.ttf
Ted --GSFontmapForFiles `pwd`/*.pfb
|
Emit a fragment for a
GhostScript Fontmap file. The second and subsequent
arguments are *.ttf, *.pfa or *.pfb file names. It always always makes
sense to use absolute font file names: GhostScript needs to know where to look for the fonts.
|
|
Ted ++AfmForFontFiles `pwd`/*.ttf
Ted ++AfmForFontFiles `pwd`/*.pfb
Ted --AfmForFontFiles `pwd`/*.ttf
|
Create an afm file for all *.pfa, *.pfb,
*.ttf files on the command line. Note that to run the command, you need to
have writing permission to the Ted afm directory, or at least in the
localfonts subdirectory. Also note that you need to
run the command with a umask that gives the generated afm files the correct
permissions (022). The ++ variant tries to leave information in the AFM
files on how to match X11 fonts to the fonts. If you use fontconfig, that
is not really relevant.
|
This section describes
how you can translate the texts on the Ted windows and where you can install translations. Ted uses property files both for its
configuration and for translated messages. If you want to install
translated Ted messages for
yourself or for all users of your computer all you have to to is to create
a translated property file and to install it in the correct location. Ted comes with an example file that can
serve as a starting point. In the section on configuring Ted I give some additional details. The
comments in the example Ted
configuration file are yet a little more elaborate.
Suppose you want to use Ted in the Erewhonian language. The
first step is to obtain translated messages. Inspect the value of the LANG
environment variable and check the Ted download site for an Erewhonian resource file. Let us assume
that LANG=eg_ER. If an rpm package is available, just install it and all
files end up in the correct location. After a manual installation of one of
the ted_eg_ER.tar.gz packages (Unpack in /), you will find a file
@DATADIR@/Ted/ad/Ted_eg_ER.ad.tar on your computer. Users with the correct
LANG=eg_ER should now see Ted
in Erewhonian. Evidently installing an Erewhonian resource file
Ted-eg_ER.properties file as @DATADIR@/eg_ER/app-defaults/Ted would have
done the same thing.
Now suppose Ted is not as popular in your country
Zembla as it is in Erewhon. This means that you have to make a translation
yourself. Check the value of the LANG environment variable. On correctly
configured Zemblan Unix/Linux systems LANG=zz_ZZ. The
Ted distribution contains an example resource file
@DATADIR@/Ted/Ted.properties.sample. It is a property file that contains
all resource values that are compiled into Ted as defaults. Copy the file to some private directory. Call it
Ted-zz_ZZ.properties. Ted-zz_ZZ.properties is the starting point of your
translation of the Ted
windows to Zemblan. Open the file in a plain text editor like vi or emacs.
Change all values you want to change. As you intend to translate the file
to Zemblan you only change the texts that Ted shows on its windows. You leave the other values alone.
Probably it is even better to delete the lines that do not give user
interface texts. The Ted
program uses suitable default values for all values that are not given in
the resource file. In addition to the window texts please enter following
values to identify the translator:
Ted.localeTranslatedTo:
zz_ZZ
Ted.localeTranslatorName:
Charles Kinbote
Ted.localeTranslatorEmail:
V.Botkin@wordsmith.edu
As Zembla is a civilized
country that uses the Metric System and ISO A4 size paper also override the
American defaults that are compiled into Ted:
Ted.unit: cm
Ted.paper: a4
Please leave
configuration settings alone. Remember that you are translating the window
texts. You are not trying to impose your personal taste upon others. Just
delete the lines with configuration settings from the file. As your
translated texts have an influence on the size of the
Ted windows, try to be concise. The Microsoft Word at a Glance booklets are translated
to almost any language. They are not only a good reference to Word but also
an excellent source of phrases and window texts.
To test your file while
you work on your translation place the translated file in your HOME
directory as ~/.Ted.properties. The next time that you start Ted the windows will be in Zemblan
independently of the LANG setting. Once you are ready you can install the
translated Ted-zz_ZZ.properties file as @DATADIR@/Ted/Ted-zz_ZZ.properties.
I would be delighted to get a copy of your Ted-zz_ZZ.properties file for
the Ted distribution.
Now that you have
started to translate Ted
related texts, you could as well translate the full manual: Copy
@DATADIR@/Ted/TedDocument-en_US.rtf to @DATADIR@/Ted/TedDocument-zz_ZZ.rtf
and translate the file. When you have finished the translation tell Ted to use the Zemblan translation for
Zemblan users. Insert the value
Ted.documentFileName:
@DATADIR@/Ted/TedDocument-zz_ZZ.rtf
in the Ted-zz_ZZ.properties file and deploy
it again. You can imagine that the translated manual is as welcome in the Ted distribution as the translated
window texts.
To use the the standard
Microsoft core fonts, install the ttf-mscorefonts-installer package. It
helps a lot if you have to render documents made with MS-Word.
If
fontconfig and the Xft font renderer are available on your machine, Ted uses these libraries to find the
list of available fonts and to draw texts on screen. With these libraries Ted will use
fontconfig to resolve the names of the fonts in
your documents and to find the font files to include in the PostScript that goes to the printer or
that is saved via the --printToFile calls. With fontconfig and Xft
available, the rest of this section is hardly relevant as the libraries do
the hard work and configuration is that of the libraries. On simple old
Unix boxes life is harder: You need to do a lot to get fonts working with
more than one program. So if you do not use a modern Linux desktop machine,
the rest of this section will tell you how to configure more fonts if you
really have to.
By default Ted is configured to use the standard
Base35 set of PostScript
fonts: AvantGarde, Bookman, Courier, Helvetica, NewCenturySchlbk, Palatino,
Symbol, Times, ZapfChancery and ZapfDingbats fonts in the Latin1 character
set. To render documents with other fonts on screen
Ted uses rather crude heuristics to substitute one
of the available screen fonts for the document fonts. On one hand this
approach avoids font configuration issues. On the other hand it limits the
the rendering and editing possibilities of Ted. As the standard afm files that come with
Ted only support a limited number of font
encodings, you will have to use afm files that describe the additional
characters in other encodings. The somewhat more experienced user can
extend the collection of fonts that are available in
Ted. This section of the manual explains how to
configure your environment to use more fonts than those in the basic set
from Ted. Unfortunately the
availability of fonts does not depend on the Ted configuration only. To edit a document on screen, an
acceptable mapping from the fonts in the document to those that are used
on screen must be possible. To print the document, or to convert it to
Acrobat PDF format, the fonts must be available for the printing system or
the PostScript to PDF conversion software. On Linux the GhostScript
software is used for both. In this document I will not discuss the various
issues with the configuration of GhostScript and the X11 Window system in
detail. If the simple procedure does not work, refer to the various font
related HOWTO documents and to the GhostScript documentation. The strong
suggestion of this section is to use the GhostScript fonts with Ted
whenever you believe that the basic font configuration is insufficient.
Sources for Font Names
Every rtf Document
contains a font list: A list of the names of the fonts that are used in the
document. To display or to print a document a text processor program like Ted or MS-Word uses the fonts in the
document font list if they are available. If the fonts are not available,
fonts that can be found on the computer are substituted for the fonts in
the document. Ted uses
heuristics to substitute fonts. Your printer, fontconfig and GhostScript use heuristics as well. The
heuristics may very well differ and the result will be ugly.
Another source for font
names is the collection of fonts that are available to Ted. On Linux the list comes from
fontconfig. On an old fashioned Unix system, it is not the collection of
fonts but a collection of font descriptions. The fonts are described by
Adobe Font Metric files. (afm files) The configurable parameter Ted.afmDirectory points to the
directory where Ted reads
its afm files. Ted opens
all afm files in the directory.Ted shows the names of the fonts in the document font list and the
font names it found in the afm files in the font tool. As explained above, Ted uses crude heuristics to match fonts
from the afm files to the ones in the document font list. With an
acceptable set of afm files this usually succeeds. This means that the
document can be formatted and converted to a
PostScript file. Unfortunately this does not mean
that that the document can be displayed on screen, or that it can be
printed on any printer. Additionally, the crudeness of the font matching
heuristics could be less than satisfactory to you.
Adding more Font Metric Files Manually
If you add more afm
files to Teds afm file
directory you tell Ted that
those fonts are available and you provide sufficient information to Ted to format documents on the basis of
the descriptions that you have provided. Every afm file is accepted as the
absolute truth: The font is mentioned so it exists. For acceptable results
when the document is printed, the font or a substitute must eventually be
available. Ted uses the
Full name and the FamilyName of the PostScript font to match it to the document font. It uses the FontName to
print. As you are the source of the information, you can easily tweak it a
little to influence Teds
behavior. With extra afm files you can provide information on extra fonts.
If you tweak them, you can use them to influence the way in which Ted matches
PostScript fonts to document fonts. As long as your
printing system (printer or GhostScript) accepts the FontName values from the afm files you can format them and print them
using the correct fonts. Ted
matches the font names in the font table of the document with the FamilyName in the AFM file. Ideally,
for every value of FamilyName,
there are four afm files: one for the plain font that has the same name as
the family, a bold one, an italic one and a bold-italic one. To display
additional fonts on screen more is needed. Finally, if the information in
an afm file does not match the font, your print out can be ugly. The afm
file is a description of an available font. If the font is not available,
or it is different, the results will be ugly. Do not give Ted afm files for fonts that your
printer or GhostScript does
not support. Please note that the procedure described in this paragraph is
a mechanism to provide PostScript fonts for the fonts listed in rtf documents. It only applies if
you have disabled fontconfig support.
Matching X11 fonts to PostScript Fonts
Again: Ted uses crude heuristics to match
fonts. For the base set of afm files that come with
Ted, the heuristics usually work. If you add afm
files to your installation the heuristics that are based on the FullName
and FamilyName values are likely to fail. You will need to tell Ted what screen fonts to use for the PostScript fonts that it knows about
from the afm files. You can provide this information in the afm files. Ted recognizes special comments in afm
files that tell about screen fonts. The comment lines look like this: Comment X11Font -urw-urw chancery
l-medium-i-normal-medium-0-0-0-0-p-0-iso8859-1. The
first word is the afm Comment word. The second word tells Ted that this is a screen font. The rest
of the line is the name of an X11 scalable font. The format for the X11
font name exactly follows that of the second column of the fonts.dir or
fonts.scalable files that the X11 server uses. The
zero sizes indicate scalable fonts.
Font Embedding
The fact that you have
the fonts on the hard disk of your computer does not necessarily mean that
you can use the fonts on your printer. If you print with GhostScript, you probably do not need to
do anything to make printing of non-standard fonts possible: You have
installed them for GhostScript
and GhostScript takes care
of the printing. If you use a real PostScript printer, it may very well be possible that the fonts that you
just have installed are not known to the printer. So you have to make them
known to the printer. Evidently you could have uploaded them to the
printer, (See below) but Ted
can also embed the fonts in the printout of your document. Ted will embed fonts in the printout if
it is configured to do so. All pfa, pfb (Type 1) and ttf (TrueType) true
type fonts that can be included will be included. Type 1 fonts in pfa
format are directly included. Type 1 fonts in pfb format are converted to
pfa format. TrueType fonts
are converted to PostScript Type 42 format. Most modern PostScript engines, including GhostScript, support Type 42 fonts. Ted recognizes special comments in afm
files that tell where the font file can be found. The comment lines look
like this: Comment FontFileName
/home/mark/.fonts/marvosym.ttf. The first word is
the afm Comment word. The second word tells Ted that this is the name of the font file. The rest of the line is
the name of the file that contains the font. Use the
embedFonts property to disable font embedding.
Additinally, on traditional UNIX systems Ted uses the GhostScript Fontmap and the fontDirectory properties.
Ted uses the GhostScript Fontmap to find the name of a font file in the font directory.
Every pfa, pfb or ttf file that can be found in that way will be included
in the PostScript that Ted emits.
Building an Afm Directory for local Fonts
Ted
finds the afm files for the standard 35 fonts that are in most printers in
its AFM directory. Usually that is in
@DATADIR@/Ted/afm. Fonts that are special for a
particular installation are picked up from the
@DATADIR@/Ted/afm/localfonts subdirectory of the
afm directory. Afm files in the localfonts directory often have special comments that help Ted with finding screen fonts and to
embed the font in its printout. For fonts that are supported by GhostScript you can use Ted to populate the localfonts directory with afm files.
Use the command Ted ++AfmForFontFiles <files> to create an afm file for all *.pfa, *.pfb, *.ttf files on the
command line. Note that to run the command, you need to have writing
permission to the afm directory. Also note that you need to run the command
with a umask that gives the generated afm files the correct permissions
(022).
Diagnosing Font Problems
To render RTF documents
in a Unix/Linux environment Ted has to reconcile several different ideas about fonts fonts: (1)
The font names in the RTF file. (2) The PostScript font descriptions that it has available in the AFM files on the
machine (3) The actual font files on the machine and (4) The X11 or Xft
fonts to draw on screen. None of the font resources are completely under Teds control. The
++AfmForFontFiles command helps to at least
reconcile (2) and (3). If the X11 fonts are correctly configured they also
help to reconcile (3) and (4). The use of fontconfig, freetype and Xft will
hopefully reconcile (1) with the rest. Unfortunately that may be restricted
to Linux desktop machines. Besides that I notice that
Teds matching heuristics are often better than the
matches by fontconfig. So fonts remain a source of trouble and confusion. Ted has some options to help you
diagnose.
1
The possibility to generate documents on all fonts: Ted --FontsDocuments <directory> will produce a document for every font in the given directory.
It will show you what fonts are available and what characters exist in the
font. The generated documents can be used to test the document on screen or
to inspect the result of conversions to PostScript or to PDF.
2
The Font page of the format tool: Immediately below the font
drawing are two lines. If a font file is known the first one shows the name
of the font file. The second line shows the name of the screen font. With
X11 fonts that is the X11 LFD name. With Xft it is the font name that is
matched by fontconfig and that passed to Xft.
Recipe for Installing Fonts
Suppose that you want to
install a set of new fonts to be used with
GhostScript and with Ted. Let us take the Lucida
fonts that come with the Sun Java JRE as an example. Most probably it is
not legal to install the fonts in another context than the Sun Java JRE but
this is only an example.
1
Assume that you are on a Linux Desktop machine and that you have
a Ted version with
fontconfig and Xft support. Copy the eight ttf files to $HOME/.fonts. Update the fontconfig
configuration by invoking fc-cache -f -v. In this case the location $HOME/.fonts is dictated by fontconfig.
2
Start Ted and
make a new document. Notice that the Lucida fonts are visible on the Font
page of the Format Tool.
3
Run Ted --FontsDocuments
/tmp/fontsdocuments. Notice the Lucida*.rtf files
in /tmp/fontsdocuments.
Convert a few of them to PostScript and notice that the ttf file is included and that the PostScript actually prints Lucida on
your printer.
That
was all on Linux Desktop machine. Now we will do the same on a simple Unix
box or with a Ted version without fontconfig or Xft.
1
Manually copy the files to $HOME/.fonts or any other directory. We now have to add the fonts to the GhostScript Fontmap file. Run Ted --GSFontmapForFiles $HOME/.fonts/Lucida*.ttf > /tmp/Fontmap. It is important
to refer to the font files by their absolute name. Add the contents of
/tmp/Fontmap to the GhostScript Fontmap. Now the fonts are known to GhostScript. The call is restricted to
*.pfa, *.pfb and *.ttf font files.
2
Check that GhostScript really picks up the font. Issue the
command gs -sDEVICE=x11
/usr/share/ghostscript/8.64/lib/prfont.ps. Type /LucidaSans DoFont at the prompt. Check
the cryptic messages to see that the correct font is loaded.
3
We will not make the fonts available to X11 so they cannot be
used on screen by Ted.
Refer to the standard X11 system administration HOWTO documents to do so.
4
Now that GhostScript knows the fonts run
Ted ++AfmForFontFiles $HOME/.fonts/Lucida*.ttf.
This will build AFM files for Ted. Configure the fonts in X11 before you
build the AFM files: Ted
attempts to keep trach of the match between X11 fonts and PostScript fonts
while building the AFM files. The information is stored in comments inside
the AFM files.
5
Run Ted --setProperty avoidFontconfig
--FontsDocuments /tmp/fontsdocuments. Notice
the Lucida*.rtf files in /tmp/fontsdocuments. Convert a few of them to PostScript and notice that the ttf file is included and that the PostScript actually prints Lucida on
your printer. The instruction to avoid fontconfig is only needed if
fontconfig is available.
As I explained above,
matching fonts either depends on the collection of afm files that describes
the fonts to Ted, or on the
fontconfig library. Sometimes the matches by fontconfig are undesired. For
that reason Ted has the avoidFontconfig property. Setting it to
1 makes Ted fall back to the afm files even if fontconfig is available.
Let me give a few
examples of undesirable fontconfig behavior.
·
The SuSE fontconfig configuration matches the Helvetica font
family to SuSE Sans rather
than to the very similar Nimbus Sans font family. SuSE Sans is very wide and has huge ascenders and descenders.
·
The DeJaVu condensed fonts do not store the fact that the fonts
are condensed inside the font file. So font matchers cannot know that the
fonts are condensed indeed.
·
The standard fontconfig configuration does not map all standard
base 35 PostScript fonts to the corresponding URW++ fonts.
The
Adobe base 35 font set is a set of 35 PostScript fonts that comes wilt almost any
PostScript implementation, including GhostScript. Unfortunately, some Linux
distributions prefer configurations where some of the fonts are mapped to
dissimilar TTF fonts because the TTF fonts look nicer on screen. Depending
on what you want to achieve, that may be very nice or very unfortunate. The Ted distribution contains a test
document @DATADIR@/Ted/varia/base35.rtf that uses all base 35 fonts and that has images of the real
base 35 fonts. In this way you can decide whether you are happy with the
fontconfig configuration or not.
@DATADIR@/Ted/varia/base35.fonts.conf is an
example that shows how to use the URW++ fonts as originally intended: As a
replacement for the Adobe base 35 fonts for
GhostScript.
The
local input method that is compiled into the X11 libraries supports a
compose key. Sometimes it is not configured; sometimes you have to try many
keys before you find it. In older versions of Xfree386, the compose
(Multi_key) is the one labeled ScrollLock on American keyboards. In newer
versions, it is not always configured. By inserting a line like xmodmap -e 'keycode 78 = Multi_key' in your private .xinitrc file, you can configure a compose key.
Sometimes,
no BackSpace key is configured in X11. All keys that backspace are
configured as Delete keys. If pushing the backspace key deletes the
character after the I-Bar, configure a BackSpace key. In Xfree386 this can
be done with the command xmodmap -e 'keycode
22 = BackSpace'
The
vertical scrollbar of a document window can be controlled with the mouse
wheel as it can be configured in XFree86. Include the line ZAxisMapping 4 5 in the pointer section of a version 3.x
XF86Config file, or the line Option "ZAxisMapping"
"4 5" in the
InputDevice section of a 4.x XF86Config file. Both
have been tested with IMPS/2 protocol mice.
To compile and link Ted, get the source code from the
download site http://ftp.nluug.nl/pub/editors/ted. Unpack the archive and follow the instructions below. If you
use other Unix versions than Linux, realize that the construction of a
distribution package uses the gzip compression utility and the chown
root:root syntax.
I want to express my
gratitude to the authors of all the free software libraries I have used for Ted. Without them, a project like Ted would have been impossible.
To compile Ted on a
debian based Linux based system you need the following development
packages: build-essential, zlib1g-dev,
libpcre3-dev, libx11-dev, libxpm-dev, libtiff4-dev, libjpeg62-dev,
libpng12-dev, libgtk2.0-dev, libpaper-dev. Use apt-get intall to install them. The deb
makefile target does this for you. On rpm based systems the packages are
called gcc, zlib-devel, pcre-devel, libX11-devel,
libXpm-devel, libtiff-devel, libjpeg-devel, libpng-devel, gtk2-devel,
libpaper-devel. Use yum
install to install them. Ted was compiled on the Solaris 11 live VM with the developer-gnu packages installed. Use pkg install developer-gnu to install
them.
Unpacking the source
archive results in a Ted-2.23 directory. To compile the executable simply
issue the command make in
the Ted-2.23 directory. There is no need to call
configure as this is done by make. You can change
some compilation options by editing the top level makefile. Refer to the
comments in the top of the file. When make is successful, there is a Ted executable in the Ted directory. To make an installation
package, call make package.
On traditional Unix systems that do not not use gnu tar, this must be done as root. The installation package
tedPackage/ted_<platform>.tar.gz is now ready. To install it on
your machine, call make install. Installation must be done as root. (Or by a system user with sufficient permission to install
software in /usr.) Those that cannot perform the last steps as root can
call make private to get a
private installation. The make private call will suggest the necessary modifications to your ~/.Ted.properties file to run from a
private installation. The ultimate possibility is to copy the Ted executable to a suitable location
and to unpack the relevant files from the tedPackage/TedBindist.tar
archive. Refer to the sections on installation and configuration for
details.
Note the deb and sysvpkg targets for packaged distributions in the root Makefile. To build the rpm package use
rpmbuild -ta ted-2.23.tar.gz --rmsource or rpmbuild --rebuild ted-2.23-1.src.rpm
if you like the Red Hat way. The rpmbuild program is part of the rpm-build package. Use yum install rpm-build to install it.
On the Ted web site, or in the source directory
of the CD you can find two example programs that build a spelling
dictionary for Ted. On the
basis of these examples, it should not be too difficult to build a
Language.dfa file. If you install this file in your private dictionaries
directory, or in the system wide one, 'Language' will appear in
the spelling tool and you can check spelling in that Language. For the
locations to install Language.dfa files, see the section on configurable
properties.
To use the examples, you
will need
•
The
ispell material is used in the example on how to make a checker from an
affix file and dictionaries. It can be found on ftp.cs.ucla.edu.
•
The
French épelle material is used in the example on how to make a checker
from a flat list of words. The French spelling material can be obtained from ftp://ftp.inria.fr.
For a list of ispell
dictionaries that might be converted, and the original ispell material
refer to the ispell site.
Mark de Does
Feb 3, 2013
More or more recent information on Ted might be available from the Ted web site
http://www.nllgg.nl/Ted. The latest versions
and the source code from http://ftp.nluug.nl/pub/editors/ted.
P.S.
Please
do not insert my mail address in web pages that refer to me or to Ted. Plain text email addresses are
automatically harvested from the web to send unsollicited email. You can
either refer to the web page or use an image.