Installing Quirky
If you are running, or able to run, any fairly modern version of Linux, then you will be able to use the Quirky Installer. If for any reason that fails, or you prefer otherwise, or you are running Windows, then you can look further down this page, the 8GB ready-made drive image, or the live-CD ISO file.
The primary download location is here, choose the latest version:
x86: http://distro.ibiblio.org/quirky/quirky6/x86/releases/
amd64: http://distro.ibiblio.org/quirky/quirky6/amd64/releases/
Quirky Installer
If you are running in a x86 (32-bit) Linux installation, download installquirky.x86.If you are running in a x86_64 (amd64, 64-bit) Linux installation, download installquirky.amd64.
Then, either click on it to execute it, or do it from a terminal:
# chmod 755 installquirky.amd64Actually, given the experimental nature of the Quirky Installer, I recommend running from a terminal, so as to see any error message that might come onto the console.
# ./installquirky.amd64
You don't have to download anything else. The Installer will offer installation choices, and download the appropriate file, and install it.
But, you can manually download '*.usfs.xz' if you wish.
The first window that will come up looks like this:
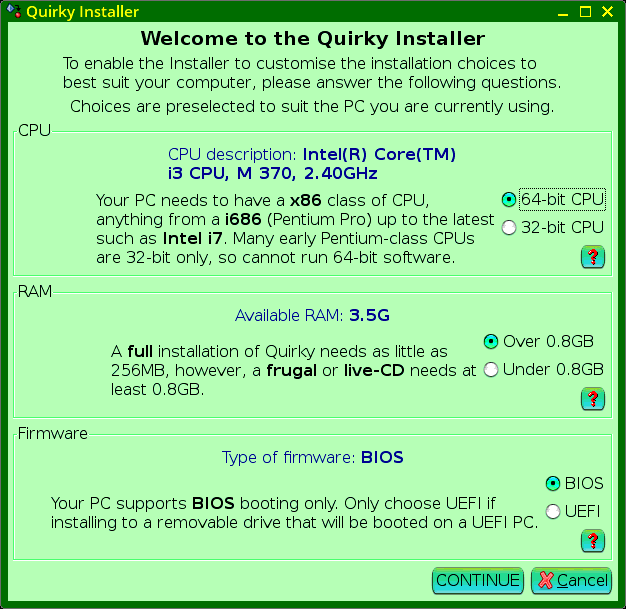
I recommend, for first-time evaluation of Quirky, to install to a USB Flash stick or SD card. Even if you have an older PC which does not have UEFI firmware (all PCs prior to those that came with Windows 8), even so do click the "UEFI" radiobutton shown in the above picture, as the USB stick (or SD card) that is created will be able to boot on UEFI-based PCs and BIOS-based PCs.
Note in the snapshot above, the little help-buttons. These are throughout the installer, and provide detailed explanation.
The USB-stick will boot on PCs with UEFI-firmware and older PCs with BIOS-firmware. The steps to enable booting of a USB stick on a UEFI-firmware PC are described here:
http://bkhome.org/quirky/uefi.htm
The Installer will also offer to install to a hard drive partition, however, it requires that a boot manager such as GRUB already be installed.
Regarding performance running Quirky from a USB stick, this is a full installation on the stick, so there is a lot of traffic over the serial USB interface. Hence the USB is a bottleneck, and a USB3-stick is preferred. Even so, USB2 performance is quite acceptable, snappy even.
The Quirky Installer requires you to be running in a Linux installation, any fairly modern version of Linux should work OK.
However, if not, say you are still stuck on Windows, then you are going to have to look at installing from a ready-made 8GB image (for a USB Flash stick or SD-card) or a live-CD ISO file. These options are discussed next...
8GB ready-made drive image
There is a ready-to-go image for a 8GB USB-stick, that is not handled (yet) by the Quirky Installer, named '*-8gb.img.xz'. If you have a 8GB (or greater) stick available, that is a simple alternative way to install and evaluate Quirky. This is also an option if you are running Windows or OSX.The steps, for Linux:
- Download *-8gb.img.xz.
- Expand and install (for example of Flash drive being sdb)
(in a non-Puppy distro, you might have to do the 'sudo' thing, to run as
root). Substitute correct name of .img.xz and drive for that of example given
here:
# xz --decompress --stdout quirky-6.1-8gb.img.xz > /dev/sdb
# sync
OR:
# xz --decompress --stdout quirky-6.1-8gb.img.xz | dd of=/dev/sdb bs=4M conv=fsync
# sync
Be careful, write to entire drive, for example 'sdb', not to a partition, example 'sdb1'.
Make sure that the drive is unmounted, as some Linux distros will auto-mount it as soon as it is plugged in.
Also be extra careful that it is the desired USB drive you are writing to, not your main hard drive!
Further documentation is required to do this from Windows. Well, you might look here:
http://sourceforge.net/projects/win32diskimager/
...but, you will need to first install an application such as 7-zip (http://www.7-zip.org/), that can uncompress an .xz file -- and be prepared, it will expand to a 7.6GB file, so make sure the partition has enough space!
This will boot on PCs with UEFI-firmware and older PCs with BIOS-firmware. The steps to enable booting of a USB stick on a UEFI-firmware PC are described here:
http://bkhome.org/quirky/uefi.htm
Live-CD
Yes, there is a live-CD .iso file that you can download.The live-CD boots and runs entirely in RAM, and can actually be used on an on-going basis without having to perform a full installation.
Sessions can be saved to a file on the hard-drive, which is automatically loaded at subsequent bootups.
The live-CD has a "install" icon on the desktop, for performing full installs to hard-drive or removable drive, or a frugal installation.
The live-CD is for booting on BIOS-firmware PCs, so for UEFI-firmware PCs, "legacy mode" has to be enabled. It is on my to-do list to make the live-CD fully UEFI-friendly.
Further information
Follow my blog for progress reports:http://bkhome.org/news/
There is of course the usual waivure of all responsibility. I provide tools and documentation in good faith, however you use them entirely at your own risk.
Regards,
Barry Kauler
November 11, 2015
Extra notes
Drive partitioning
Puppy and Quirky have Gparted, a drive partitioning tool. A Win8 PC typically has Windows installed in a large partition, usually the "C: drive", and it is unwise to decrease the size of that with Gparted, if you want to create a partition to install Quirky.Instead, Win8 has its own disk partitioning tool, as described here:
http://www.howtogeek.com/101862/how-to-manage-partitions-on-windows-without-downloading-any-other-software/
Of course, booting Quirky from a USB Flash stick is no problem. But if you do want to install Quirky in a partition in the hard drive, then you will need to use the Win8 Partition Manager, then checkout how to install a Boot Manager.