 |
Vector Linux 5 Documentation |
System Administration with VASM |
CONTENTS1. Introduction 2. User features vs Root features 3. Use in X-Windows (GUI) 4. Use in Text Mode 5. Switching to Text Mode 6. Detailed descriptions 6.1. AUTOSETUP 6.2. USER 6.2.1. ADD 6.2.2. DEL 6.2.3. PASSWD 6.2.4. PASSROOT
    6.3. XWINDOW
           6.3.1. XCONF
           6.3.2. XDMSET
           6.3.3. XWMSET
           6.3.4. BOOTSET
    6.4. SERVICE
           6.4.1. BOOTSET
           6.4.2. INITSET
           6.4.3. HWSET
           6.4.4. SRVSET
           6.4.5. CUPSWEB
           6.4.6. SAMBAWEB
    6.5. NETWORK
           6.5.1. NETCONF
           6.5.2. NAME
           6.5.3. INET
           6.5.4. WIRELESS
           6.5.5. MODEM
           6.5.6. FIREWALL
    6.6. HARDWARE
           6.6.1. HWCONF
           6.6.2. HWSET
           6.6.3. ALSACONF
           6.6.4. CDSET
           6.6.5. MOUSESET
           6.6.6. KEYMAPSET
           6.6.7. DATESET
           6.6.8. ZONESET
    6.7. FILESYSTEM
           6.7.1. FDISK
           6.7.2. FORMAT
           6.7.3. MOUNT
           6.7.4. LILO
           6.7.5. BACKUPSYS
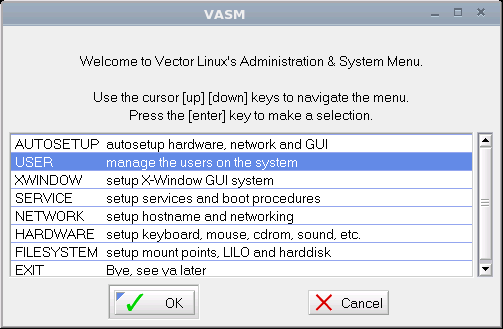
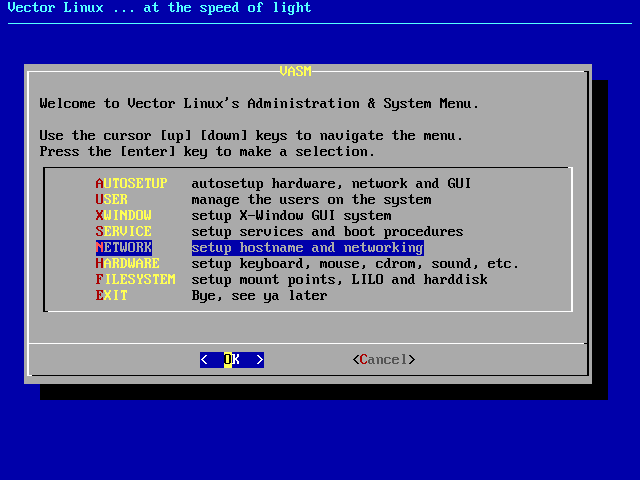
7. Credits 1. Introduction"VASM" is short for "Vector Administrative and Services Menu" and is Vector Linux's main system configuration tool. This document discusses VASM as implemented in VectorLinux v 5.9. VASM has been available in all versions of VectorLinux since 2.0, but has been upgraded with each release with new choices and the addition of a menu system since VL SOHO v3.2 and above. Recently, VL has added VASMCC to version 5.9. VASMCC provides a very newbie-friendly GUI iconic interface to the VASM menu system, making it easier for the new user to find his/her way around VL system administration commands. More information on using VASMCC can be found here. VASM is the same in both CLI (text) and GUI mode. The script automatically identifies the mode you are currently in and uses the appropriate interface. Screenshot:
Some special notes: Screenshot:
2. User features vs. Root featuresYou can use VASM as a normal user or as privileged root user (System Administrator). The difference is that running it as a normal user gives you access to only those functions that affect that particular user, whereas in root mode you can access the full range of options that affect the entire system and/or all of the users. If you launch VASM as a normal user, you may access the root mode by selecting the "SUPER" entry in the menu. You will then be required to enter the root´s password to be granted permission. This is, of course, a security measure. Note: The tools available to normal users are a subset of those available to root user. This document explains the complete functionality of VASM. 3. Use in X-Windows (GUI)If you have started your window manager of choice, double-click on the VASM icon or from the main menu select "System", then select "Vector Administrative and Services Menu or VASM" and VASM will then be loaded onto your screen. Depending on your VL version, you may have an icon on your desktop labeled "Vector Administrative and Services Menu", click it and you will presented with VASM´s interface. If you are running the system as a regular user you will see an entry named "SUPER" to access to the root level, select it and you will be prompted to enter the root´s password. Please, be aware that some functions in VASM require the system to be running in Text Mode and not GUI Mode (see chapter 5). 4. Use in Text ModeTo launch it, type in console mode "vasm" (lowercase) without quotes and hit enter. This will start an ncurses based menu. Use the cursor [up] [down] keys to navigate the menu. Press the [enter] key to make a selection. If you wish to exit use the [left] [right] arrows to select CANCEL. If you are running the system as a regular user you will see an entry named "SUPER" to access to the root level. Select it and you will be prompted to enter the root´s password. 5. Switching to Text ModeFor some of the administrative tasks available in VASM, like configuring the X Server, hardware autodetection, etc., it is safer, or even strictly required, that the system is running in text mode (Run Level 2). When this situation appears, VASM will let you know and you will not be able to perform such tasks from your window manager. If you are running in GUI mode, log out of it, then:
6. Detailed descriptionsThis section explains, in order, each of the configuration utilities available to the root user in VASM.
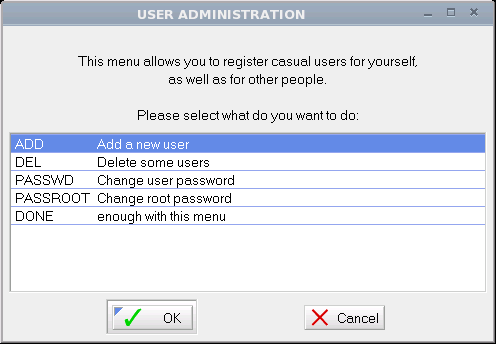
6.1. AUTOSETUPAutosetup goes through the same autodetection and autoconfiguration process that was performed at installation time. Doing this means resetting your system to almost fresh install status. Therefore some of the configurations post-install that you may have done to the system could be re-set to some default value. If you need to reconfigure something on your system it is advisable to use the specific VASM entry for that task. 6.2. USERWith this section of VASM you can manage users. You have to be logged in as administrator of the system, so login as 'root' via console or SUPER option in VASM. Command line: /sbin/vuser Screenshot:
6.2.1. ADDPurpose: Add a new user to the system. Command line: /sbin/vuseradd First you will be asked to enter a login
for this new user. The next dialog will ask you to enter the
real name of the person corresponding with the login name you
entered in the previous dialog. The following dialog will ask you to enter an id for this user. Choose a unique id for the user you want to add or just accept the default by pressing enter for the next dialog. You will get a list of groups the user can be a member of. Select the groups the new user must have access to. Mostly you can accept the defaults. Deselect the groups to limit the access rights. In a fresh VL5.x install the following
groups are available: Click on 'Ok' if you're finished setting the groups. Now you will get a view of the login name,
real name, user id etc. The last step is to enter a password for
the new user. In the dialog that follows, you will be asked to re-enter the password you gave. Press 'enter' or click on 'Ok' after you entered the password again. The last dialog confirms the creation of
this new user on the system.
6.2.2. DELPurpose: delete a user from the system. Command line: /sbin/vuserdel After you choose this option you will get a
list of the users on the system.
6.2.3. PASSWDPurpose: change the password of an user. Command line: /sbin/vpasswd With this option you can change the password of a user. Select the user from the list (double click on the user or select with the arrows up/down and press 'enter'). Enter the new password for this user and press 'enter' or click on the 'Ok' button. In the dialog that follows, re-enter the password you gave in the previous dialog and press 'enter' or click on 'Ok'. If the password matches you will see a confirmation of the change. You will return to the USER ADMINISTRATION menu.
6.2.4. PASSROOTPurpose: Change the password of 'root', the administrator account of your Vector Linux system. Enter a new password for 'root' in the first dialog and re-enter the password in the second dialog. See 6.2.3 PASSWD. 6.3. XWINDOWThis section deals with the configuration of the X window system. You will need to be running the system in console mode (see Section 5).
6.3.1. XCONFPurpose: Configure the system´s X server for compatibility with your video card, monitor and mouse hardware. Command line: /sbin/vxconf Walk Through: When you enter the Xconf section you can choose between three options:
6.3.2. XDMSETPurpose: allows you to choose the X Display Manager, that is, the utility in which you log in when the system boots automatically to GUI mode. Command line: /sbin/vxdmset Walk Through: Select the one you prefer, and press "Ok". You will be asked if you want to test it at that moment, something that requires the X server to be restarted, so you will have to close any running applications. If you choose not to test it, you will be taken back to the previous menu.
6.3.3. XWMSETPurpose: Sets up which Window Manager is launched from the console when you type "startx" and your system is configured to boot in text mode. Command Line: /sbin/vxwmset Walk Through: When you choose this option, you will be given a list of available window managers to start when you use startx. Make a selection or cancel.
6.3.4. BOOTSETPurpose: configure you system to boot directly into GUI Mode or Text mode (these are technically known as "runlevels"). Command Line: /sbin/vbootset Walk Through: When you select this option, you will be given the choice between "text mode desktop", "text mode server", "GUI mode desktop" or "GUI mode server". The difference between desktop and server choices is in the services they start, i.e. ssh, apache, and the like. Independently of this menu, you can further configure which services are started or not selecting "Service" then "Srvset" in VASM´s main menu. Warning: Ensure X-windows works before setting the system to start in graphics mode (try "startx" before defaulting to graphics mode). 6.4. SERVICEAllows you to configure services started at boot time. Command Line: /sbin/vsrvmenu
6.4.1. BOOTSETPurpose: configure your system to boot directly into GUI Mode or Text mode (these are technically known as "runlevels") Command Line: /sbin/vbootset Note: This option is also present in the XWINDOW Menu. Walk Through: When you select this option, you will be given the choice between "text mode desktop", "text mode server", "GUI mode desktop" or "GUI mode server". The difference between desktop and server choices is in the services they start, i.e. ssh, apache, and the like. Independently of this menu, you can further configure which services are started or not selecting "Service" then "Srvset" in VASM´s main menu. Warning: Ensure X-windows works before setting the system to start in graphics mode (try "startx" before defaulting to graphics mode).
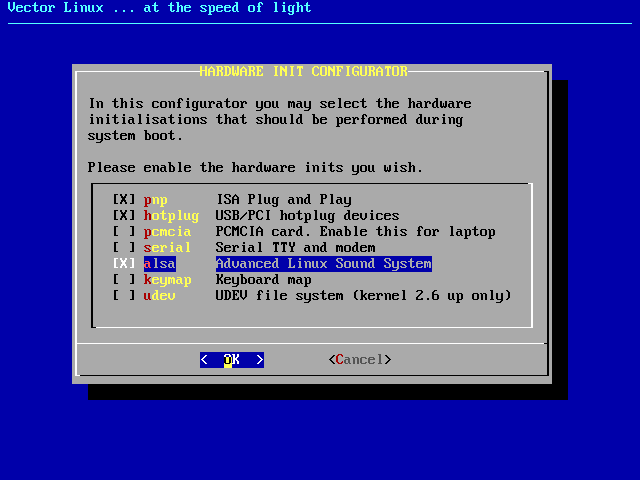
6.4.2. INITSETPurpose: Allows you to choose the services initialization method to use when you switch runlevels with the "init <run_level>" command. Command line: /sbin/vinitset Walk Through: the initialization system starts or stops services when you switch run levels using the "init <run_level>" command. The standard initialization system is called SysV-Init. When switching run levels, it kills all services of the previous level then starts all services of the new level. Vector Linux offers a faster init system: It does not kill the services only to start them again in the next runlevel. So here you can choose what method you prefer. 6.4.3. HWSETPurpose: This menu allows you to enable or disable the initialization of hardware components of your system. Command line: /sbin/vhwset Walk Through: When selecting this entry a list will appear, showing the hardware you can initialize at boot time. This means that if you plan to use a parallel port printer you need to set "parallel" to be initialized at boot time, but if you don´t plan to, you can disable it and free some system resources. The available options are:
Screenshot:
6.4.4. SRVSETPurpose: Here you can configure what services, such as ssh server, http server, etc., are started in different runlevels. Command line: /sbin/vsrvset Walk Through: You are presented with a list of the runlevels. Select the one you wish to configure and press Enter. Then you will see the available services and which ones are set to be started when the system enters that specific runlevel. Toggle the ones you want to enable or disable and press "Ok". You can modify services for other runlevels or exit the menu. Screenshot:
6.4.5. CUPSWEBPurpose: Allows you to add and configure local and networked printers. It requires the CUPS package to have been installed and the CUPS daemon to have been started on your system. If you need to install it, please refer to the VectorLinux Printing Guide, where you will find more detailed instructions. Command line: /sbin/vcupsweb Walk Through: This option launches the web browser and attempts to connect to the local port for CUPS. There, you will have the choice to add, remove, and configure local and networked printers, print jobs, etc. If you use this option from console mode, the launched browser will be lynx. While lynx is very capable for the task, you might find it more comfortable to use this option in GUI mode, where Firefox will be used.
6.4.6. SAMBAWEBPurpose: Allows you to configure file and printer sharing through the network with other systems. Specifically for sharing between Windows and Linux machines. Command line: /sbin/vsambaweb Walk Through: This option launches a web browser and connects to "SWAT", an application that provides a relatively easy way to configure file and printer sharing. If SWAT is not running you will asked whether you want to start it or not. You need to accept in order to access its web-based configuration interface. You can use this in text mode, but the text browser will probably make the task harder than it needs to be, so you are encouraged to do this in GUI mode, where a more capable browser will be started. Note: Dillo, a very light graphical web browser doesn´t support some required features, so you can´t access SWAT with it. 6.5. NETWORKSetup network configuration. Command Line: /sbin/vnetmenu
6.5.1. NETCONFPurpose: Walks you through setting up a basic network connection. This program is only needed if you are connected to a LAN or a cable modem network. Command Line: /sbin/vnetconf Walk Through: When you select this option the program will prompt for information required to set up the network connection. 1. Input computer name and domain name in the form of "computername.domainname". If you are not connected to a domain, that is, you are a lone computer workstation connected only to the Internet it is best to type in a computername only. 2. IP address. You have three choices: Static, DHCP and Loopback. If you have a DHCP server (perhaps a router) select DHCP from the list (this is the case for most users connected to the Internet via an ADSL or cable modem). If you have no lan card choose loopback. If you wish to set a static address choose Static. If you choose Static you will then be prompted for the IP address for the machine and then the netmask of the network. Next you will be prompted for the IP address of the gateway to the Internet. Finally, you will be asked for the IP address of the name server.
6.5.2. NAMEPurpose: Set hostname and DNS server Command Line: /sbin/vnameset Walk Through: When you select this option the program will prompt for information required to set up the network connection. 1. Input computer name and domain name in the form of "computername.domainname". If you are on a personal workstation not connected to other computers you do not require a domainname. 2. Input IP address of the the domain name server.
6.5.3. INETPurpose: Setup one or more network interfaces that will be automatically started at system initialization. Each inet script may have a different network device and TCP/IP setting. Command Line: /sbin/vinet Walk Through: When you select this option you will be provided a menu of options.
6.5.4. WIRELESSPurpose: Manage wireless configuration files - change interface, add, delete and change connections. These configuration files are stored in /etc/wireless/. The second group of options start, stop and give the status of a connection. This is done via /etc/rc.d/rc.modules. Use Network:INET option to set up the ethernet interface. Command Line: /sbin/vinetset Walk Through: When you select this option you will be provided a menu of options.
Notes: Assumes that the wireless interface has
been installed and working.
6.5.5. MODEMPurpose: Utility for configuring a dial-up connection to an ISP. You need to know a number of things about your ISP (phone number, authentication method, etc.) and your modem (device, baud rate, init string, etc.) Command Line: /sbin/vmodemset Walk Through: If you select this menu item, you will be given a list of serial ports. Select the port where your modem is attached. The ports included are those used by a Linmodem, but this script does not install or setup these modems. If you know what COM device it was under Windows, you can select the listed equivalent. Otherwise, you can try the autodetect or you might have to do some experimenting. The best course is to start at ttyS0 and work your way down the list. Next you will be asked for the user name and password for your ISP's connection for PPP dialers such as X-ISP. You can skip this if you are using GkDial or KPPP, which you will have to configure yourself.
6.5.6. FIREWALLPurpose: Sets up basic network protection and Internet sharing. Command Line: /sbin/vfirewall Walk Through: This option calls a submenu of options to setup a basic firewall/gateway. The options are:
Important notes: This firewall script is able to handle simple filtering (open/close the host port) and simple masquerading (become an Internet gateway). However, this script is relatively basic,
so it is recommended that you use more advanced firewall tools
(like guarddog/guidedog, included in SOHO) to create more advanced
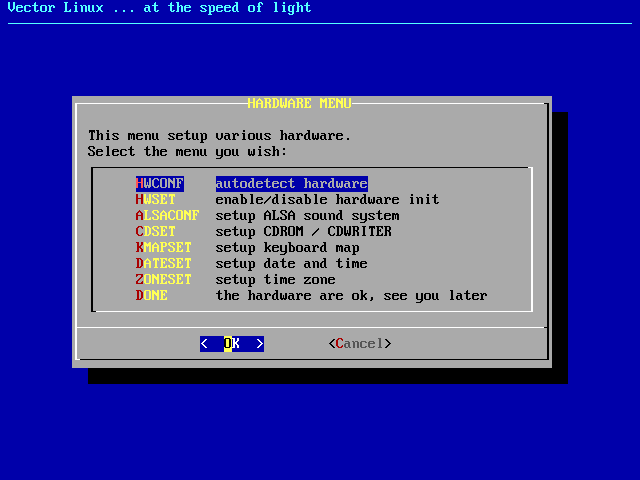
rules. 6.6. HARDWARESetup keyboard, mouse, CD-ROM drives, sound, etc. Command Line: /sbin/vhwmenu
6.6.1. HWCONFPurpose: Autodetect hardware devices on your system.Command line: /sbin/vhwconf Note: The autodetection routine will start as soon as you select this option. Be sure that you want re-detect your hardware before selecting this. Walk Through: Must be run from console mode. If used under X you will receive the message telling you so. When you select this option the system will immediately start to probe the system's components. You will see windows showing detected devices as they are found and configured. Since this is an AUTO-Probe you don't have the means to configure the detected devices - the system will do that for you. This mostly deals with the detection of the hardware itself and not so much with the fine-tuning. For example, it will detect and activate your ethernet cards, but if you want to enter you network configuration you have to resort to the "Network Menu". Screenshot:
6.6.2. HWSETPurpose: This menu allows you to enable or disable the initialization of hardware components in your system. Command line: /sbin/vhwset Walk Through: When selecting this entry, a list will appear, showing the hardware you can initialize at boot time. This means that if you plan to use a Parallel port printer you need to set "parallel" to be initialized at boot time, but if you don´t plan to, you can disable it and free some system resources.The available options are:
6.6.3. ALSACONFPurpose: Setup ALSA (Advanced Linux Sound Architecture). Command line: /sbin/valsaconf Walk Through: Must be run from console mode. If used under X you will receive the message telling you so. When you run ALSACONF, a dialog appears asking you to close any open application related to sound. When you press "OK" the system will try to autodetect any present sound device and you will see a progress bar indicating the status of the detection. You will then be presented with the detected cards and asked to select the one to use or if you want to probe the system for older, non-PnP, ISA cards. If ALSA detected any onboard or PCI sound device and you chose that one then when you press "OK" the driver will be loaded and the device will be configured for activation at boot time. Press "Ok" To accept the confirmation dialog and you will be taken back to the "Hardware Menu". If you choose to probe the system for legacy sound cards you will receive a warning stating that the system may become unstable; press "Yes" to proceed. A dialog appears with a list of the available modules (drivers) to probe. While the list may seem a bit short, it actually covers a much wider range of sound cards which work with similar drivers. Uncheck any particular module you don't want to be probed and press "Ok". You will be asked if the system should probe for possible IRQ and DMA combinations. Since doing so takes more time, you could skip it for now to see if the card is detected, and if it is not, then re-run alsaconf enabling this option instead. You will finally see the results of the probing and a request to choose the card to be used by the system.
6.6.4. CDSETPurpose: Allows you to configure the location of your CD-ROM and CD-Writer drives. Command line: /sbin/vcdset Walk Through: When a CD-Rom is detected, you will be prompted to accept the creation of a symbolic link (/mnt/cdrom) pointing to it. When a CD-Writer is detected, either after, before or instead of a reader unit, you will be asked if you want to allow access to it by ordinary users, if you select "Yes", they will be able to use programs like XCDRoast, otherwise, only root will have access to it. Using CDSET results in some changes to the LILO bootloader, so you will need to reboot the system for the changes to take effect.
6.6.5 MOUSESETPurpose: Configure your pointing devices type and protocol. Command line: /sbin/vmouseset Walk Through: When you select this entry you are presented with a list of possible pointing devices, from standard mice to graphic tablets, plus an autodetection option. After selecting your device type, you are asked some more details like how many buttons does it have and, for serial devices, what port it is attached to. After entering this information you are taken back to the Hardware Menu. The mouse configuration takes effect after you start or re-restart the X Server, thus, to avoid finding yourself with a non-working mouse if you select an incorrect configuration, it is highly recommended that you switch to text mode to use this feature (see chapter 5).
6.6.6. KEYMAPSETPurpose: Change the map layout used by your keyboard. Command line: /sbin/vkmapset Walk Through: Select the one that matches it and press "OK" test the selection by typing characters such as @ & #, erase them, and type 1 (by itself) to accept the layout. Type 2 (by itself), or "Cancel", to go back to the maps selection and choose a different one.
6.6.7. DATESETPurpose: Set date and time of the system. Command line: /sbin/vdateset Walk Through: The use of this option is rather self-explanatory. Select the date by clicking it, select a different month or year using the arrows next to them, and then press "Ok". Do the same for the time, and then press "Next" to commit the changes to the system.
6.6.8. ZONESETPurpose: Changes settings to reflect if your clock is set to local or universal time zone. Command Line: /sbin/vzoneset Walk Through: When you choose this option you will be asked if the clock in your machine is set to local or UTC time. Choose no if local and yes if UTC. Most likely it is set to local time. You will then be given a list of timezones, select the best match and press "Next" to activate the change. 6.7. FILESYSTEMPerform disk partitioning and formatting, setup drives and partitions to be mounted, LiLo bootloader and system configuration backups. Command Line: /sbin/vfsmenu 6.7.1. FDISKPurpose: This option launches cfdisk, a text mode application capable of editing your hard disk partitions. Command line: /sbin/vfdisk The use of this program is beyond the scope of this guide, but we advise you to use it with care, and to remember that you must select the "Write" option for any changes to be commited to the partition map before you exit the application.
6.7.2 FORMATPurpose: Formats partitions, clearing all the data in them, while creating a new filesystem. Command line: /sbin/vformat Walk Through: By launching this option, you are presented with a list of the partitions on your system that can be formatted. Only unmounted partitions can be formatted, so make sure the one you intend to format meets this condition or it will not be presented in the list. To format a partition select it from the list and press OK, then follow the instructions. Notes: Be careful when you select the partition to format, once it is done, all of the information contained in it will be erased.
6.7.3. MOUNTPurpose: Setup additional partitions to be mounted at boot time. Command line: /sbin/vmount Walk Through: This tool is an easy method to configure additional local disks or partitions to be mounted in your system. Select the option and you can ADD or REMOVE mount points.
6.7.4. LILOPurpose: This option helps you build the /etc/lilo.conf configuration file so that you can install LILO to your system. The Linux Loader, or LILO, is a popular booter in use on many Linux systems. It is quite configurable and can easily be used to boot other operating systems such as Windows. Command Line: /sbin/vliloconfig Walk Through: When selecting this option, you will be given the choice to use simple or expert mode. If this is your first time setting up LILO, you should pick the "simple" option. If you are familiar with LILO and Linux, the "expert mode" may provide you additional levels of control, which could lead to faster configuration.
6.7.5. BACKUPSYSPurpose: Allows you to backup important system files. Command line: /sbin/vbackupsys Walk Through: This utility allows
you to keep multiple backups (up to 9). It is also designed to
backup system configuration files, which most of the time are small
text files. There are three available options:
7. CreditsCopyright 2006 Vector Linux |